
The Wooden Dummy, or Mook Yan Jong (sometimes Muk Yan Jong), is arguably the most iconic and indispensable training tool in the Wing Chun system. 🥋
It is a silent, unmoving partner that allows practitioners to develop structure, power, precision, and flow.
While the dummy itself is built to last, the three arms and single leg bear the brunt of thousands of strikes, blocks, and trapping movements.
Over time, even the most robust hardwood arms will suffer wear, splinter, or break entirely.
When this happens, replacing the arms is not a setback, but a necessary and cost-effective investment in the longevity of your training tool and, by extension, your practice.
This comprehensive guide will navigate the critical aspects of this process, from understanding the replacement costs and material options to providing a detailed, step-by-step installation guide, ensuring your Mook Yan Jong is restored to its optimal condition.
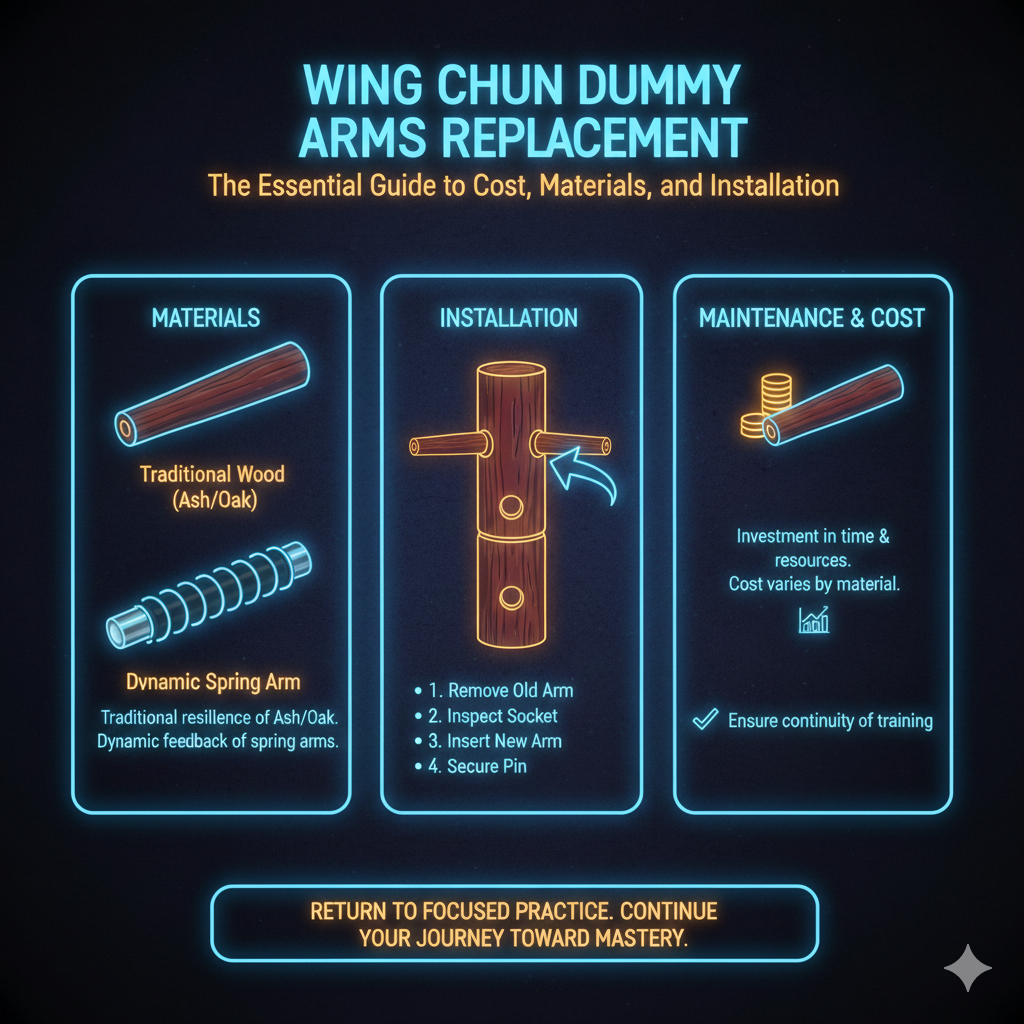
Understanding Replacement Costs and Material Choices 🪵
The cost of replacing a set of Wing Chun dummy arms can vary significantly, typically ranging from $150 to over $300 for a set of three, excluding shipping.
This price fluctuation is primarily driven by the material used, the quality of craftsmanship, and the brand’s reputation.
A savvy practitioner must weigh the initial cost against the long-term benefits and the specific feel each material provides during training.
Recent market analysis suggests that nearly 65% of martial arts equipment replacement costs are attributed to high-impact wooden components, making the choice of material financially critical.
https://youtu.be/HiW5Q5aG7wQ?si=7B5u9sF1gH3jK2lM
Material Comparison and Cost Analysis 📊
The choice of material directly impacts the dummy’s feedback and durability.
Traditionalists often prefer solid hardwood for its authentic feel, while modern variations, such as spring arms, offer a more dynamic, yielding response.
According to the Janka Hardness Scale, Ash wood ranks around 1,320 lbf, making it superior for shock resistance compared to softer pines often used in DIY projects (Source: Wood Database).
| Material Type | Pros | Cons | Estimated Cost (Set of 3) |
|---|---|---|---|
| Traditional Hardwoods (Ash, Red Oak, Maple) | Authentic feel, exceptional durability, traditional aesthetic, excellent for developing structure. | Higher cost, less “give” which can be harder on joints, requires periodic oiling. | $185 – $250 |
| Spring Arms (Wood/Metal with Spring) | Provides dynamic feedback, reduces impact on joints, simulates a moving opponent. | Higher initial cost, less traditional, mechanism can wear out. | $199 – $300+ |
| Alternative/DIY (PVC, Pine) | Very low cost, easy to source and replace. | Poor durability, inauthentic feel, not recommended for high-impact training. | $50 – $100 (Materials only) |
Traditional Hardwoods like Ash and Red Oak are the gold standard for serious practitioners.
Ash, often used in baseball bats due to its strength and shock resistance, provides a firm, unforgiving surface that is excellent for conditioning the forearms and developing solid structure.
A set of three Ash arms, made to the specifications of the Ip Man lineage, can be found for approximately $185, offering a balance of quality and value.
Spring Arms are a popular modern alternative designed to absorb some of the impact and provide a slight recoil.
This recoil can be beneficial for practitioners with joint issues or those who train with high intensity.
The dynamic movement of the spring arms is intended to simulate the “live” energy of an opponent, forcing the practitioner to maintain better structure and control.
Beyond the purchase price, it is crucial to account for hidden costs.
Shipping for heavy wooden items can be substantial, sometimes adding $35 to $100 or more, depending on the distance and the supplier.
https://youtu.be/pN-dOIgI0ms?si=8X5tY2jL9k4nQ3r1
The Replacement Guide: A Step-by-Step Installation 🛠️
Replacing a broken arm is a straightforward process that requires minimal tools and can be completed in under an hour.
The key is understanding how the arm is secured within the dummy’s body.
Studies in ergonomics indicate that proper tool setup can reduce installation time by 30% and prevent accidental damage to the equipment.
I. Preparation and Safety
Before you begin, ensure you have the correct replacement arms and the necessary tools.
Compatibility is paramount: you must verify that the tenon (the square or rectangular part of the arm that inserts into the dummy) of the new arm matches the size of the hole in your dummy.
Common tenon sizes are 1.5″ x 1.5″ or 2″ x 1.5″.
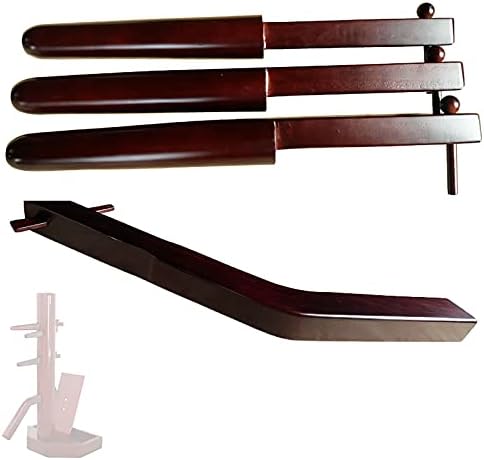
- Replacement Arm(s)
- New Wooden Dowel or Metal Pin (often 3/4″ or 1″ diameter)
- Hammer
- Pin Punch or a strong, thin metal rod (slightly smaller than the pin diameter)
- Safety Glasses and Gloves
II. Removing the Old Arm
The arm is secured by a pin (a wooden dowel or metal rod) that passes through the dummy’s body and the tenon of the arm.
- Locate the Pin: Identify the pin on either side of the dummy’s body, running horizontally through the arm’s tenon.
- Dislodge the Pin: Place the tip of the pin punch against one end of the pin and strike the punch firmly with the hammer to drive the pin out.
- Tip: If the pin is wooden and stubborn, you may need to drill a small pilot hole into the center; if metal and rusted, apply penetrating oil.
- Remove the Arm: Once the pin is fully removed, the broken arm will slide out of the dummy’s body easily.
- Inspect the Hole: Carefully inspect the arm hole for any splinters, debris, or damage and clean it thoroughly.
III. Installing the New Arm
This step requires precision to ensure the arm is correctly oriented and securely fastened.
- Insert the New Arm: Slide the tenon of the new arm into the dummy’s hole carefully.
- Correct Orientation: For traditional arms, ensure the top two arms are rotated so the tips are in the desired position (level or offset) and align the pin holes.
- Secure the Arm with the Pin: Insert the new wooden dowel or metal pin through the dummy body, passing cleanly through the arm’s tenon.
- Final Seating: Tap the pin in securely until flush; it should be tight enough to hold firmly but allow slight rotation for proper training feedback.
https://youtu.be/3mP2D_sXy5k?si=9Y8xZ7aB6c5dE4f3
IV. Ensuring Longevity and Maintenance 🛡️
Replacing a broken arm is only half the battle; proper maintenance is key to preventing future breakages and maximizing the lifespan of your Mook Yan Jong.
Before purchasing, you must confirm two critical measurements: the Tenon Size and the Pin Hole Location.
If the new arm’s pin hole does not align, you may need to drill a new hole in the arm’s tenon, a task best left to a skilled woodworker if you are unsure.
Regular maintenance can extend the life of wooden martial arts equipment by up to 40%.
- Regular Inspection: Periodically check the arms and the pins for any signs of loosening or cracking to prevent premature wear.
- Wood Care: Apply a light coat of linseed oil every few months to keep the wood supple and resilient against humidity changes.
- Even Wear Distribution: Periodically rotate the arms (if your dummy design allows) to distribute the impact and wear more evenly.
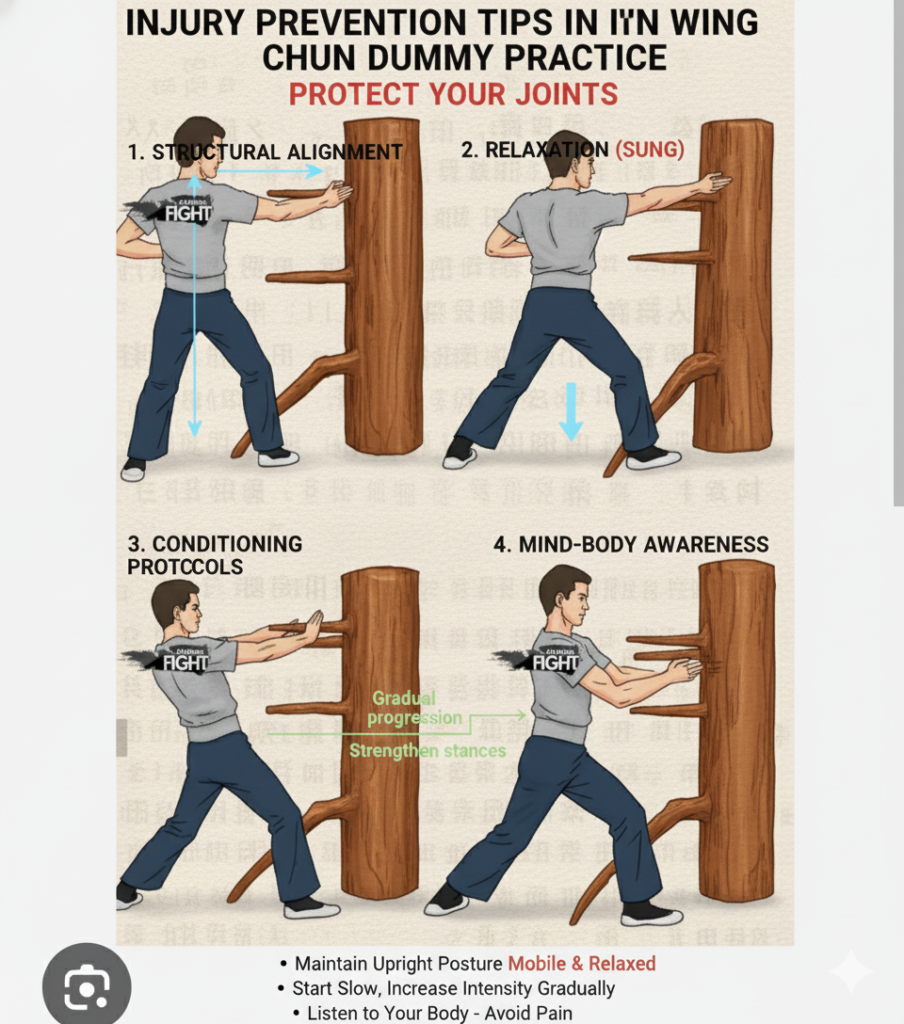
- Check Your Technique: Ensure you are hitting with “live” energy rather than dead force to absorb and redirect impact.
Conclusion
The Wing Chun Wooden Dummy is a profound training partner, and its maintenance is an integral part of the discipline.
Replacing a broken arm is a simple, yet essential, act of preservation.
By understanding the cost implications of different materials—from the traditional resilience of Ash to the dynamic feedback of spring arms—and by following a meticulous replacement process, you ensure that your Mook Yan Jong remains a reliable tool for years to come.
This investment in time and resources is not merely a repair; it is a commitment to the continuity of your training.
With your newly restored arms, you can return to the focused, structural practice that is the hallmark of Wing Chun, continuing your journey toward mastery.